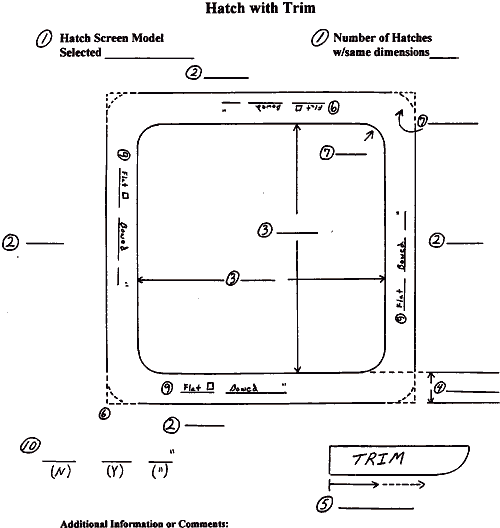
Please print these instructions out for easy reference while you measure your screens.
Directions for Measuring Hatches with Trim

1) Write screen design you have chosen on each hatch diagram and the number of hatches with these dimensions. Line # 1
2) Label Fore, Aft, Port & Starboard on diagram. Lines #2
3) Measure inside dimensions of the hatch and write these in appropriate spaces. Lines #3
4) Measure total width of trim and fill in this dimension. Line #4
5) Decide the distance you want screen to extend past the inside edge of trim. This distance should not extend past the flat part of the trim. The screen should mount flush against the trim and not hang over the rounded outer edge of the trim. Note: If you are ordering the HS-1 Single Pane design you must allow 3/8" of flat trim surface to allow for the turnblocks. Line #5
6) Indicated whether the corners of the trim are square or rounded by filling in the appropriate dotted lines at each corner.
7) If rounded, determine inside and outside corner radius using the guides included in measuring kit and write this number on lines marked #7.
8) If the hatch opening is not square and you would like either the HS-2 "Swing-Down" or HS-3 "Slide-In" screen design, indicate the orientation you want. For the "Swing-Down", write "HINGES" on the side where you want the hinges to go. For the "Slide-In", label the side from which the screen will enter and exit.
9) Take a straight edge and place it up against and parallel with the length of each side of the trim to determine if it is flat or if it is curved. (If all sides are not flat, the curvature is normally on the fore and aft sides) If bowed, hold the straight edge up against the length of the curved side and the end of a ruler against the trim, and measure the largest point in the gap between the straight edge and the trim. Write whether the side is flat or, if bowed, the amount of the gap and with an arrow indicate where it was located on each side on lines 9. The greatest gap is usually in the middle but not always.
10) Place the straight edge across the hatch opening and draw it across the complete length to see if any part of the hatch mechanism (dogs, screw knobs, spring bars, slide bars etc.) extends below the surface of the trim. If some part does and it cannot be moved or modified, hold the straight edge next to the part and with the end of the ruler flush with the top of the straight edge, measure how far the part extends below the trim. In the space for # 1 0 write either "NO" or "YES" and the measurement.
11) A final note. Make sure there are no objects or other constraints around the hatch that will prevent the screen from opening and closing properly, especially with the "Slide-In" design.
p